
How to build a wicking bed
- Indi

- May 1, 2023
- 4 min read
You've probably heard about them and maybe you are wondering what the fuss is all about. Or, maybe they seem complicated, over engineered and not worth your time. Wicking beds can be very simple, and we reckon they can be useful in our hot, dry, South Australian gardens.

Wicking beds can be made from sealed growing containers of any kind (broccoli boxes, pots, raised garden beds, IBC containers, wine barrels...). 'Wicking' refers to the action of water being drawn vertically upwards through the soil from a reservoir below via capillary action for use by plant roots. So, instead of watering from above, you simply refill the water reservoir below via an inlet pipe. An outlet pipe tells you when the reservoir is full.


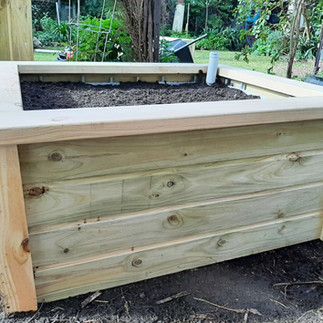
An IBC container converted into a wooden clad wicking bed.
The biggest advantage of wicking beds is that they save water, whereas standard open-bottomed raised garden beds typically dry out very quickly. In South Australia, we live in a drylands environment, meaning we lose more water annually through evaporation than we receive through rainfall. Every drop of water is precious in our gardens, and wicking beds help us reduce watering, while still producing lots of food.
The other advantage to wicking beds is that they provide a self contained growing environment. Maybe the soil in your garden is contaminated, or competition from the roots of large trees nearby make growing impossible due to a lack of nutrients and water. You can use wicking beds to create an isolated growing environment for these conditions, or where plants need special care, for example an acidic environment for blueberries.
With wicking beds, the gardener is responsible for the health of the soil in the bed, as it is not in contact with surrounding soil ecology. So, it's up to you to introduce organic matter, worms and other microorganisms to make sure the soil is healthy.
So...how do you build one?
Step 1
Find a waterproof container. Make sure you check it really holds water! If your vessel leaks or has an open bottom, you can carefully line it with builders plastic or pond liner. You can use silicone to seal any lids or gaps. Situate the container in its new position, and make sure it is level!
Step 2
Workout how big your reservoir will be, mark and drill/cut your outlet spot and install your outlet pipe. The height of your reservoir is determined by the overall height of your container, and by how much space for soil you need. Most annual vegetables need 20-40cm of space for the roots to grow happily. Larger trees will need more. Your reservoir can be any size. In the wine barrel below, the reservoir is about 8cm tall, and it holds about 16L of water once full. We are growing citrus in these pots, so we opted to make the reservoir a bit smaller, to increase the amount of soil available for the tree.


To cut our oulet, we used a 19mm drill hole saw, because our outlet is made of 19mm poly pipe. The hole created by the saw is just a bit too small, but with some jiggling of the saw to make the hole a bit wider, you can get a really snug fit. Adding an elbow to the outside means you can rotate it to face upwards (as pictured) and have the reservoir fill fully, or rotate it down and have it drain. This is important in winter, otherwise roots can rot in overly saturated soil. In this configuration, the reservoir will not fully drain as the outlet is close to the top of the reservoir. We had to place it here due to the metal rings on the barrel. You can use silicone to seal any gaps between the outlet hole and the pipe if it's leaky.
Step 3

Arrange your inlet pipe and fill your reservoir. In a larger bed, you would use slotted agricultural pipe to help disperse the water throughout the reservoir.
You can use any kind of material in the reservoir as long as it doesn't deteriorate in the water: scoria, gravel, water up cells, or other recycled plastic. Fit the inlet pipe so that its top reaches above the soil level.
Step 4
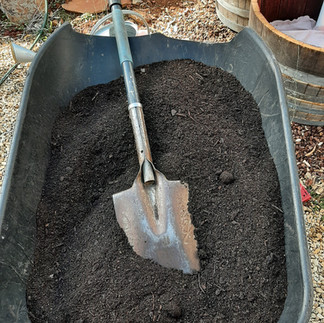
Cover your reservoir material with a material that will allow water through but prevent the mixing of the reservoir layer with the soil layer. Often people use geotextile fabric for this, available from hardware stores. Ensure your outlet pipe is not disturbing this protective material. Add your soil. We recommend a mixture high in organic matter, with some added coir (coconut fibre from the coconut industry, sold in bricks at gardening shops). This helps hold on to moisture in the soil, and supports soil structure. We generally go for a mix of 50% compost and 50% good quality potting mix, with coir mixed in. Try what works for you. Worm castings, leaf mould, and well aged manure would all be a great addition.


Step 5
Plant and mulch! Get your seedlings, shrubs or trees planted and cover them up with some mulch.

Additional Considerations
Wicking beds are just one of the tools in our gardening tool box. They are great when you can't grow in ground and need raised beds, but they shouldn't be an automatic addition to every garden.
They use a lot of energy intensive materials to set up (particularly if you are purchasing coir, gravel, scoria and geotextile fabrics our buying new containers)
You need to keep introducing organic matter to feed soil microbes and worms
When something goes wrong, you will need to empty the beds out to fix leaks etc. so they can be higher maintenance than some other garden beds.
If you do want to use them, we recommend starting with just one or two and learning how to set up and maintain them properly, before investing all your time and energy into one strategy in the garden.
Here's a video of Sophie Thompson making her wicking beds.
Happy growing!


Winter veggies growing happily in wicking beds at Indi's place over a concrete driveway close to their house.


Comments